Monday, July 16, 2012

My Summer Projects
Here is what I have been up to so far this summer!  As soon as school was out I got my paintbrushes and paint out and had a blast.   I was asked to be a vendor at a church shopping event, so I made plenty of door hangers.  I still have a few remaining and I've marked them down.   I would love to sell them all.   See each picture below for details on price, etc.

 Handpainted Crosses
These crosses measure 20x30 and come in a variety of colors.  I sold all of the 
ones I painted for the show, but I am still taking orders for crosses.  They are 
painted on foam board so they are light and do not scratch up your door.  


 Baseball Door Decor
$15 with our without lettering
 

 Beach Ball Door Decor
$15 plain
$18 personalized
 

 Cupcake Door Decor
Celebrate your loved one's birthday with a fun cupcake on the door.
$15 as pictured
$20 choose your colors and message

 Onesies!
The perfect way to announce your bundle of joy!
$15 - blue still available
$18 for new orders


 Watermelon Door Decor
$7.50  - 2 available
 
 My display at the church shopping event!

Please contact me if you are interested in anything you see here.  

Thanks and have a blessed day!

Melony
 aka Cleverly Creative Girl


Saturday, May 26, 2012

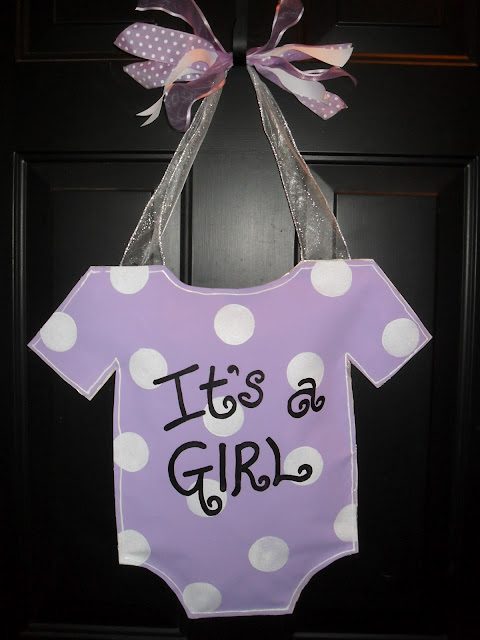
Onesie Door Hanger

Here is my latest creation!   A sweet friend at work is expecting her first grandchild and wanted something special to go on her daughter's door.   The nursery is going to be lavender, so I thought a lavender onesie would be a cute decoration.    She loved it!!   The fun door decoration is made out painted canvas and was really simple to do.   I will be adding this design to my Cleverly Creative Girl Shop on this website.   Other colors and styles available.  Please let me know if you need one of these cute designs for your next baby shower or new addition!  

Have a blessed day!

Melony
aka Cleverly Creative Girl

Friday, April 6, 2012

Easter Cross Door Decor


Well, now that it is Easter weekend, I finally finished the cross I had started working on a couple months ago. If you recall, this cross was a leftover foam board cutout from the moss covered crosses I made last year. It had been sitting in my garage all year just waiting for something to be done with it.

So, I finally brought it in and started doodling on it with paint. I started out by painting the cross a bright spring green. Then I just started making random flower shapes with a variety of colors.

Once it was dry, then I went back in and added detail and outlines with paint pens. I just LOVE how it turned out. It looks so fresh and springy on my black front door. It really pops from the street. Then I just added some fun orange polka dot ribbon for a hanger. It was so easy! I wish I had gotten it done sooner, but it's been a little busy around here. I plan on keeping it up well after Easter is over.

Hoping that you take time to celebrate the true meaning of this holiday, the death, burial and resurrection of our Lord and Savior Jesus Christ! He is Risen! He is Risen indeed!

Blessings,

Melony
Cleverly Creative Girl

Tuesday, March 27, 2012

"He is Risen" Framed Scripture


"He is Risen"

Since Easter is only a couple weeks away, I wanted to make a few things to celebrate. I found this quote here and loved it so much, I decided to make a piece of framed art to put with my other Easter decorations. I love the way it turned out! I printed the scripture out in color and then framed it out with beautiful turquoise linen textured paper with a slight sheen to it. The paper is gorgeous! The picture definitely does not do it justice! Then I put it all in a classic white 8x10 frame and added a spring green plaid bow to the top. I love how fresh and clean it looks. I like the less traditional "Easter" look that it has. I am very pleased with how it turned out.


Here is a close up of the print. Simple, yet elegant.

Here is one last close up of the picture. This photo really shows the beauty of the turquoise paper I used to mat around the scripture. Sorry for the glare, but it was the only way to get the true picture of what the paper looks like.

Have a blessed day,

Melony
"Cleverly Creative Girl"

Monday, February 13, 2012

Recent Paintings For Sale

My Paintbrush is Ready!

I love a good "snow day." Even though there's not really that much coming down right now, we did get the day off from school. So, I plan on making the most of it by painting and crafting all day!

Here are a couple recent paintings I did this past week:
Razorback Face
Size: 11x14 canvas
Price: $25
Other sizes available. More Razorback designs coming.


Icing on My Cupcake
Size: 11x14 canvas
Price: $25
Other designs or sizes available. Can be personalized.


If you are interested in either of these paintings, please let me know. If you would like me to paint you something different or something in a different size, I can do that as well.

Thank you for stopping by my blog! Have a blessed day!

Melony


Monday, February 6, 2012

All on a Sunday afternoon...

Getting My "Craft" On

This past Sunday afternoon, I decided to sit down and paint. I didn't have anything planned in particular. I just sat and stared at the blank canvas in front of me. For whatever reason, I decided to paint a cupcake. After all, cupcakes are quite trendy right now! lol


So this is what I came up with. Not bad for my first try at painting a cupcake, I guess. I love the fun colors. My daughter now wants to know if the cupcake will be hanging on the wall in her room now. Haven't decided that yet! Anyway, it was a lot of fun and I hope to paint even more cupcakes, etc, in the near future. Let me know if you need a cupcake for someone "sweet" in your life!


Here's another shot of the cupcake beside the Razorback I painted a few weeks ago. I'm working on some other designs for all you Razorback fans out there. Hopefully I will be able to finish it soon.

Then I decided to play with paint on a leftover foam board cross I had in my garage from last year's project of moss covered crosses. That plain cross had been staring at me all year! So I decided it was time to do something to it. I decided to paint some fun, whimsical flowers on it. Keep in mind, I am not done with it yet. This was all I had time for yesterday. I still have to add detail to the blue and orange flowers and then fill in the spaces with other designs. I think it's going to look so cool when I'm done. I love the fun spring colors, but I also think it would look great in just about any color.
Here is a close up of some of the flowers. Again, I still have more detail to add to them. It's definitely a work in progress. This is my "prototype" of future projects to come for Easter.

And finally, I decided to make a Valentine heart for MY door! I love the fun whimsy design this one has. Can't wait to get it finished and on my door.

Well, that's all I have for you today. Just a few fun projects from the weekend. I will be sure to post the cross when I get it finished. I think it's going to turn out great when it's finished. Hopefully this has inspired you to pick up a paint brush. You never know what you might create!

Blessings,
Melony


Saturday, February 4, 2012

Valentine Heart Door Decor

Last Call for Valentine Hearts!!


I wanted to let everyone know that I am getting ready to trade in my Valentine hearts for another project. So, if you still want to order a Valentine Heart for your door, please let me know as soon as possible! They are $25 and you can choose your wording. They come in two styles. Please see my previous post for examples of some hearts I've designed.

I am currently working on some Razorback canvas designs, as well as continuing to make the orange burlap basketballs. Not to mention that I am thinking ahead to the next holiday theme! So, you'd better get your "hearts" while you can!

Thanks so much to all of you that have been supporting my fun little creative business! I appreciate you!

Blessings,

Melony
aka Cleverly Creative Girl

Saturday, January 28, 2012

Take Heart ... Valentine's Day will soon be here!


I love Valentine's Day for so many reasons! I am married to a wonderful man (love you, Baby), red is my favorite color, I love Valentine's candy and I also love to draw/doodle hearts, etc. So, to get in the spirit of things, lately I've been making several red burlap hearts to hang on your door for Valentine's Day. Working with burlap is so easy and it comes in so many colors. I used some leftover red burlap from Christmas to make several designs.

To make the large heart decorations:

1. Make a large heart pattern out of paper. Mine measured 24 in. wide by 21 in. long. Fold burlap so that it is double thickness, then you can cut both the front side and back side of the heart out at the same time. Trace the heart onto your burlap with chalk, which can easily be wiped off.

2. Cut out both layers of burlap at the same time. This will insure that the edges of both sides of your hearts will line up and make it easier when it comes time to join the two sides together.

3. Next, paint a design on your heart. I used acrylic paints. Because the red burlap is so dark in color, it tended to bleed through the white paint, turning it more of a pink color. But, since pink is a Valentine color, too, I didn't mind. I started off by painting white polka dots on all the hearts. In this example, I also added black dashes around the edges.

In this example I painted "Be Mine" free hand with black. I then realized that it was really off center, so I decided to make various swirl designs around the edges to make it less noticeable. This design turned out to be one of my favorites! So, don't get frustrated if you make mistakes, just turn it into something else!

In this design, I painted the wording, then decided to make a black and white check border. I started with painting a one inch wide black border around the heart. Then I let it dry.
Once it was dry, I went back with my white paint and painted one inch white squares on the black border. I think this really makes the borders "pop."

4. Once you have finished painting your designs and they have dried thoroughly, you can begin to join the front and back pieces together. I simply use staples to join them together. It's quick and easy. I stapled about every one inch. I found that if I stapled where it had been painted, it seemed to hold better. Staple a little more than 3 quarters of the way around, leaving an opening to stuff the heart.

5. Stuff the heart with waded up plastic grocery sacks until the heart is fairy firm. Then finish closing up the edges.

6. Next you need to add a way to hang the heart. I used both ribbons and wires. On the hearts with the painted edges, I used wire to make a hanger and then added ribbons to the top of the wire. For hearts without the painted edge, I make a hanger with ribbon and then tied extra ribbons in the center of the ribbon hanger.

Here are a few more examples of some of the hearts I designed. Because I work in a Christian school, I had requests for designs that spoke of God's love for us. I love the way they turned out!
(Sorry for the blurry picture!)

I am taking orders for hearts in the Little Rock area. If you would like for me to design a heart for you, please contact me via this blog, email (cleverlycreative@gmail.com) or by phone (501) 223-9515. The hearts are $25 each. Please contact me soon, as only a limited number are available. Thanks!

Melony
(aka Cleverly Creative Girl)


Sunday, January 8, 2012

Celebrating My HOGS!!

How 'bout them HOGS!!!
2012 Cotton Bowl Champions!

I am so proud of my Razorback Football team! They did such an awesome job this year. In honor of my Alma mater, I enjoyed a girls night out with a friend at our local Spirited Art studio and painted a Razorback. It was so much fun and it really got my "creative juices" going again after not doing much art during the holidays. Here is the picture I painted. I added a few extra things to the original painting they had us paint. Always gotta put my spin on things.


Doing this painting gave me some great ideas for other things I would like to start painting. So, check back regularly. You just never know what I might be painting next!

Have a blessed day and creative day!

Personalized Clipboard

Personalized Clipboards


Here are a few samples of some personalized clipboards that I made for Christmas this year. I think they turned out so cute! Choose your colors, choose your design! The clipboards are $15. Contact me today if you are interested in a clipboard!